
Looking to stock your freezer with ready-made meals? No need to rely on packaged, processed foods. These recipes can be made ahead of time and frozen, enabling you to have healthy, delicious eats at the ready. (Be sure to follow guidelines for proper freezer storage times.)
Breakfast
Breakfast Egg Muffins
 Photos: Andrea DAgosto; Prop Styling: Alicia Buszczak; Food Stylist: Paul Jackman
These kale-and-tomato mini-quiches could be frozen for up to a month.
Makes 6 servings
Prep time: 20 minutes
Cook time: 25 minutes
INGREDIENTS
- 5 large eggs
- 1/2 tsp. salt
- 1/2 cup plain Greek yogurt or 4 oz. lox, chopped
- 1 tbs. extra-virgin olive oil
- 1 1/4 cup Roma tomatoes, chopped (about 2 medium)
- 1 cup kale, chopped
- 1 tbs. fresh thyme or rosemary, or One teaspoon. dried
DIRECTIONS
- Preheat oven to 350 degrees F. Line a 6-cup muffin pan with paper liners or grease with plenty of olive oil.
- Whisk the eggs and salt in a medium bowl. If using yogurt, whisk into the eggs until smooth. If using lox, fold into the eggs until combined.
- Heat olive oil in a small sauté pan over medium-high heat. Add the tomatoes, kale, and herbs, then stir to combine.
- Cook, stirring frequently, until the vegetables are soft and shrunken and also the pan is nearly dry, around three minutes.
- Remove from heat and let cool to 70 degrees, then fold into the egg mixture.
- Divide mixture among prepared muffin cups and bake for 25 minutes or until the tops are puffed and brown.
- To store, cool completely and transfer to an airtight container. Refrigerate for approximately four days or freeze within an airtight container or freezer bag for approximately a month.
Source: “Breakfast Egg Muffins” (Experience Life, 2021)
Breakfast
Crispy Oat Waffles

These gluten-free waffles can be made ahead of time and reheated to order.
Makes five servings
Prep time: 20 minutes
Cook time: 15 minutes
INGREDIENTS
- 1 cup unsweetened almond milk or milk of choice
- 1 tbs. ground flaxseed
- 1/4 cup unsweetened applesauce
- 1 tsp. white or apple-cider vinegar
- 1/4 cup avocado oil or melted coconut oil
- 1 tbs. maple syrup
- 1/2 tsp. vanilla
- 1 1/2 cups gluten-free rolled oats, divided
- 1 tsp. baking powder
- 1/4 tsp. sea salt
- Oil for waffle iron
DIRECTIONS
- In a small mixing bowl, combine milk, flaxseed, applesauce, and vinegar; let take a few minutes. Add oil, maple syrup, and vanilla. Whisk thoroughly, then put aside.
- Place 1 cup of the oats inside a blender and grind into a powder, stopping to scrape down as needed. Added the baking powder and salt and pulse several times to mix. Use a spatula to scrape the bottom of the blender container to ensure everything is mixed in. Add the remaining 1/2 cup oats and pulse just to mix in. Let the mixtures are a symbol of 10 minutes until thickened.
- Preheat the waffle iron, based on manufacturer's instructions, for about five minutes. When the iron is hot, open it and oil lightly. Measure 1/2 cup batter in to the middle of the iron and close the top. In about two minutes, once the waffle is browned and crisp. Transfer the waffle to a plate or a cooling rack. Repeat with remaining batter.
- Serve hot, or cool completely and put in a zip-top freezer bag. To thaw, toast frozen waffle in a toaster or toaster oven, and serve with desired toppings.
Source: “Crispy Oat Waffles” (Experience Life, 2021)
Lunch
Creamy Vegetable Soup
 Photo: Andrea DAgosto; Prop Styling: Alicia Buszczak; Food Stylist: Paul Jackman
Use your favorite veggies in this soup, which is blended with coconut milk and white miso paste.
Makes four servings
Prep time: 10 minutes
Cook time: 20 minutes
INGREDIENTS
- 2 tbs. extra-virgin olive oil
- 2 large onions, chopped
- 8 cups chopped broccoli, carrots, cauliflower, squash, or kale
- 1 cup vegetable or chicken stock, plus much more to taste
- 1 cup fresh parsley, basil, or arugula
- 1 14.5-oz. can coconut milk
- 1 tbs. white miso paste
- 1/2 tsp. salt
DIRECTIONS
- Heat a large pot over medium-high for Thirty seconds, then add oil and heat until shimmering. Add onions and lower heat to medium-low. Stir occasionally until golden and soft, about 10 minutes.
- Add vegetables and stir, adding stock. Cover the pot tightly and switch the heat to medium-high. Cook for about five minutes. Uncover and test the vegetables by piercing having a paring knife. Continue cooking until tender.
- Transfer vegetables to a blender with the parsley, basil, or arugula. Add coconut milk, miso, and salt. Secure the lid tightly and cover with a folded towel to hold the lid down. Purée until smooth. Increase the stock as necessary to achieve desired consistency.
- Serve garnished together with your favorite toasted nuts and shopped fresh herbs.
Source: “Creamy Vegetable Soup” (Experience Life, 2021)
Lunch
Roasted Butternut Squash Soup
Photos: Andrea DAgosto; Prop Styling: Alicia Buszczak; Food Stylist: Paul Jackman
Have this creamy, vegan soup immediately, or freeze it for approximately three months.
Makes six servings
Prep time: 25 minutes
Cook time: 35 to 40 minutes
INGREDIENTS
- 2 tbs. extra-virgin essential olive oil, plus a drizzle for garnish
- 1/2 tsp. sea salt, plus more to taste
- 1 tsp. ground allspice
- 1/2 tsp. ground cinnamon, along with a sprinkle for garnish
- 3 tsp. freshly grated gingerroot, or 1/4 tsp. ground ginger
- 2 apples, unpeeled, rinsed, and cut into 1-in. cubes
- 1 small (about 1 lb.) butternut squash, peeled, seeded, and cut into 1-in. cubes (about 5 cups)
- 6 cups vegetable stock
- 1/4 tsp. freshly ground black pepper
- 1 tbs. freshly squeezed lemon juice, plus more if needed
- 1/4 cup chopped fresh flat-leaf parsley, for garnish
DIRECTIONS
- Preheat oven to 400 degrees F and line a rimmed baking sheet with parchment paper.
- In a little bowl combine the essential olive oil, 1/4 teaspoon salt, and the allspices, cinnamon, and ginger, and stir until combined. Toss the apples and butternut squash using the spice mixture until evenly coated and put them in a single layer on the prepared baking sheet. Roast for 25 minutes, or until tender.
- Pour 2 cups broth right into a blender; add about a third of the roasted squash and apples, and blend until smooth, adding more broth as needed. Transfer to a soup pot over low heat and repeat the process two more times using the remaining broth, squash, and apples.
- Add 1/4 teaspoon salt, the pepper, and fresh lemon juice. Taste; you may need another spritz of fresh lemon juice or a pinch of salt.
- Garnish with olive oil, cinnamon, and parsley. Serve warm. Store leftovers within an airtight container in the refrigerator for up to five days or in the freezer for up to three months.
Source: “Roasted Butternut Squash Soup” (Experience Life, 2021)
Dinner
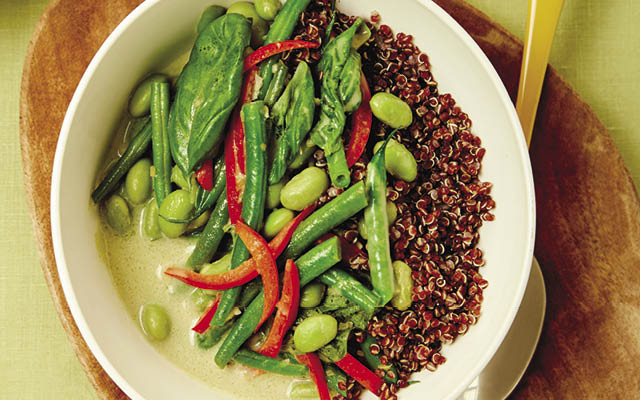
Green Curry With Edamame
 Photos: Andrea DAgosto; Prop Styling: Alicia Buszczak; Food Stylist: Paul Jackman
This super-fast coconut-milk curry is packed with red bell pepper, green beans, edamame, fresh garlic, and basil.
Makes four servings
Prep time: 10 minutes
Cook time: 15 minutes
INGREDIENTS
- 1 tbs. extra-virgin olive oil
- 1 tbs. green-curry paste, plus much more to taste
- 1 14.5-oz. can coconut milk
- 4 cloves garlic, chopped
- 2 tbs. chopped fresh gingerroot
- 2 tbs. brown sugar or sucanat
- 1 tbs. tamari
- 1 medium red bell pepper, sliced
- 2 1/2 cups peas, trimmed and sliced
- 12 oz. frozen shelled edamame, thawed
- 1/2 cup fresh basil
DIRECTIONS
- In a sizable skillet, heat oil over medium-high heat. Fry curry paste within the oil for one to two minutes, stirring frequently, until fragrant.
- Whisk within the coconut milk, garlic, gingerroot, sweetener, and tamari, and bring to a simmer.
- Add the pepper and green beans to the pan and bring to a boil. Reduce the heat to medium and stir until the vegetables start to soften, around three minutes.
- Add the edamame and cook for about eight minutes, stirring occasionally, before the sauce thickens.
- Garnish with fresh basil and serve over cooked quinoa or rice.
Source: “Green Curry With Edamame” (Experience Life, 2021)
Dinner
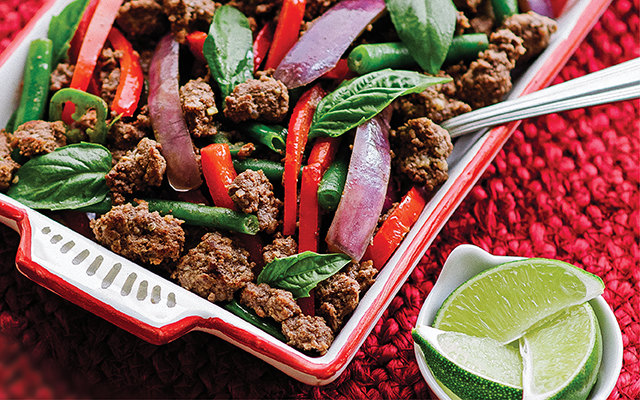
Thai Basil Beef
 Photography by David Humphreys
This stir-fry features the classic interplay of Thai flavors: sour, sweet, salty, bitter, and spicy.
Makes 2 to 4 servings
Prep time: 15 minutes
Cook time: 25 minutes
INGREDIENTS
- 1/2 cup water
- 1/2 lb. green beans
- 3/4 lb. Japanese eggplant, reduce strips
- 2 tsp. coconut oil
- 1 large red bell pepper, thinly sliced
- 1 1/2 lb. ground beef
- 1 small jalape~no, sliced
- 1 tsp. salt
- 3 cloves garlic
- 1 lime
- 1 tbs. fish sauce
- 2 tbs. coconut aminos
- 4 scallions, sliced
Generous handful fresh basil leaves
DIRECTIONS
- Boil water inside a large, well-seasoned cast-iron skillet over high temperature. Add the green beans and eggplant, cover the pan, and steam the veggies until they're just tender, about four minutes. Transfer the vegetables to a large bowl and empty out the water.
- Pour the coconut oil in to the skillet and warm the pan over medium-high heat. And also the bell pepper and cook, stirring occasionally, until just soft and starting to get brown spots, two minutes. Transfer the pepper towards the bowl with the beans.
- Return the skillet towards the heat; add the ground beef, jalape~no, and salt. Cook before the meat is browned and sizzling.
- Peel and crush the garlic and place it in a small bowl. Squeeze the juice from the lime into the bowl and add some fish sauce and coconut aminos. Whisk having a fork to combine.
- Return the veggies towards the skillet and use two wooden spoons to toss them with the meat. Add the sauce and stir to coat the meat and veggies. Cook before the sauce browns and thickens. Switch off the heat, add the scallions and basil towards the pan, and toss to combine.
Source: “Thai Basil Beef” (Experience Life, 2021)
Snack
Chocolate-Banana Energy Bars
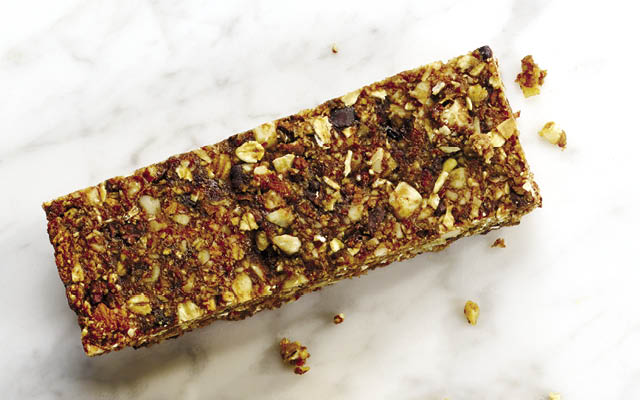
Store-bought varieties are often high in sugar and unhealthy oils. Follow this recipe to create a nutritious version.
Makes approximately 12 bars
Prep time: 15 minutes
Bake time: 25-30 minutes
INGREDIENTS
- 1 cup coconut flakes
- 1 cup almonds
- 1/3 cup oat flour
- 2 tsp. cocoa powder
- 1/2 tsp. sea salt
- 1/2 cup dates
- 1/2 cup cacao nibs
- 1/4 cup mashed banana
- 1 tbs. vanilla extract
- 1 tbs. brown-rice syrup
DIRECTIONS
- Preheat oven to 300 degrees F. Line a 13-by-9-inch baking dish with parchment paper.
- Place coconut flakes and almonds in the bowl of a food processor and pulse several times until chopped into pebble-size pieces. Scrape mixture into a bowl.
- Add oat flour, cocoa powder, and sea salt to nut mixture and stir until combined.
- Place dates in the bowl of food processor and process until they form a paste.
- Add cocoa nibs, mashed banana, vanilla extract, and brown-ride syrup to dates and process until combined.
- Add half of the nut mixture to the food processor and process until combined. Add remaining nut mixture and process again.
- Scrape mixture into prepared dish. Make use of a second sheet of parchment paper and press down firmly before the mixture forms one tightly packed layer.
- Bake 25 to Half an hour, until slightly golden at the edges.
- Let dish cool for Ten minutes, then use the parchment-paper edges to lift the uncut bars out of the dish. Place on a wire rack and funky completely before slicing into bars.
- Store bars in an airtight container at 70 degrees for one week or in the refrigerator for up to two weeks. Freeze for up to 3 months and thaw before enjoying.
Source: “Chocolate-Banana Energy Bars” (Experience Life, 2021)
Dessert
Coconut-Lime Energy Bites
 Photos: Andrea DAgosto; Prop Styling: Alicia Buszczak; Food Stylist: Paul Jackman
These easy no-bake energy bites are made with dates, almond butter, and tropical ingredients.
Makes 12 servings
Prep time: 10 minutes
INGREDIENTS
- 1/2 cup soft dates
- 1/2 cup dried pineapple, coarsely chopped
- 3 tbs. almond butter
- 1 tbs. fresh lime juice
- 2 tsp. fresh lime zest
- 1/4 cup coconut flakes, plus 2 tbs. for coating
DIRECTIONS
- Place all the ingredients (minus the coating) inside a powerful blender or mixer.
- Blend, scraping down the sides frequently before the mixture forms a coarse purée.
- Spread coating on a large plate.
- Scoop out level tablespoons the mixture, then roll into 1-inch balls and place on the plate.
- Roll the balls within the coating until well covered, then place in an airtight container and refrigerate for approximately a month.
Source: “Coconut-Lime Energy Bite” (Experience Life, 2021)